Bring some festive cheer to your website by adding animated snowflakes - Ho ho ho
Created on Thursday, 12th December at 18:00pm
TLDR; All the files, demos, any bug-fixes and production-ready
code are also available on Github:
https://github.com/disruptionlaboratory/make-it-snow
1 Let's find a snowflake
You're welcome to do a Google search for a different one or create your own, but here's one I found which is freely available to use without any limitations. Ideally, you'll want a SVG, but a PNG with transparency will also work.

I then did something you're not really supposed to do.
I converted it to base 64 so that I could copy and paste the output into the code to make it easier for deployment. It's a tried and tested method - but it does take up a little more space.
Open up the command line, cd into your project directory and run the command below (assuming you're using Linux or Max).
cat snowflake.svg | base64
Output will look something like this
PHN2ZyB2ZXJzaW9uPSIxLjEiIGlkPSJDYXBhXzEiI...zdmc+Cg==
but it will be over several lines.
Alternatively, you can download the base 64 encoded string below.
Download SVG image as Base 64 Encoded String
Okay, great. Let's leave that for the moment. We'll come back to it later.
2 Let's create a demo html file and spin up a local development server
You will need to ensure you have node and npm already installed. Directions for installing these are outside the scope of this tutorial. Please visit https://docs.npmjs.com/downloading-and-installing-node-js-and-npm for more details.
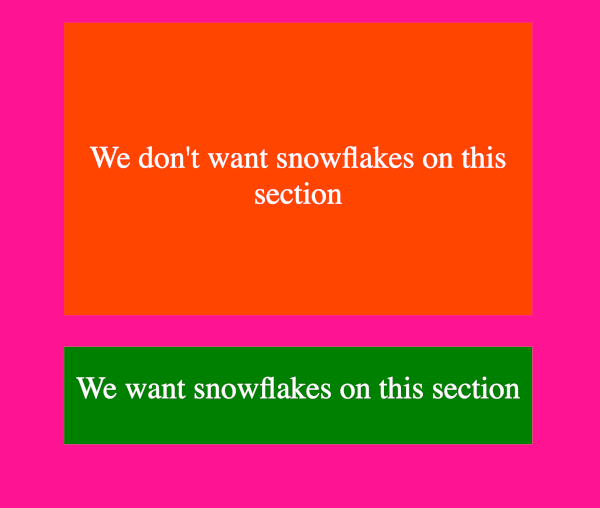
Create a file called index.html. Copy and paste the markup below into the file.
<!DOCTYPE html>
<html lang="en">
  <head>
    <meta charset="UTF-8" />
    <title>Make it snow</title>
  </head>
  <body style="background-color: deeppink">
    <div
            style="
        width: 960px;
        margin: 0 auto;
        height: 600px;
        background-color: orangered;
        z-index: 100;
        position: relative;
      "
    >
      <p
              style="
          font-size: 4em;
          color: #fff;
          text-align: center;
          padding-top: 25%;
        "
      >
        We don't want snowflakes on this section
      </p>
    </div>
    <div
            style="
        width: 960px;
        margin: 0 auto;
        height: 200px;
        background-color: green;
        z-index: 50;
        position: relative;
      "
    >
      <p
              style="font-size: 4em; color: #fff; text-align: center; padding-top: 5%"
      >
        We want snowflakes on this section
      </p>
    </div>
  </body>
</html>
If you don't already have http-server installed, run the following command.
npm install --global http-server
This program will allow you spin up a local server. This is necessary to ensure the demo page works properly in your browser.
The following command should be run inside the same folder containing your index.html file.
http-server -c-1 -p 8181
Visit http://localhost:8181/ in your browser. You should see something like the following.
3 Let's load the snowflake image
Okay, let's roll up our sleeves now and start doing some work. Open up the index.html file in your preferred text editor and insert some script tags at the bottom of the file befoe the closing body tag.
        We want snowflakes on this section
      </p>
    </div>
    <script></script>
  </body>
</html>
Normally, we'd be writing code in a separate file and then linking to it but as we're just getting started, it's much easier to work inside index.html.
The first thing we want to do is work out how we're going load the image programmatically. Inside the script tags add the following code.
const encodedImage = "PHN2ZyB2ZXJzaW9uPC9zdmc+Cg==";

const image = new Image();
image.src = "data:image/svg+xml;base64, " + encodedImage;

image.onload = () => { document.querySelector("body").appendChild(image); }
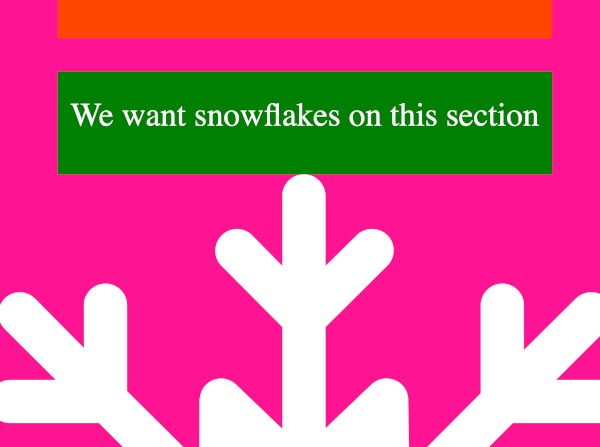
Swap out the placeholder dummy base 64 string "PHN2ZyB2ZXJzaW9uPC9zdmc+Cg==" with the output you created earlier and then refresh your browser. Scroll down and you should see something like the following, a giant mutant snowflake.
So...don't panic! Everything's fine.
We just need to apply some CSS styles.
The important thing is to understand what's happening.
We're using the "new Image()" to create a new Image object and we're also passing it the encoded data.
It takes a little time before the image data is "loaded" so we also create an anonymous callback function which will be called when it has been loaded.
When the anonymous function is called, we know it's safe to create a new HTML element on the DOM. We add it as a child element to the body element..and that's also why it appears at the bottom of the screen. Phew!
4 Let's position and style the snowflake image
Before the new Image() line, let's add some variables which will be used in a moment to help position and style the image.
const encodedImage = "PHN2ZyB2ZXJzaW9uPC9zdmc+Cg==";

const width = 25;
const x = 10;
const y = 10;
const zIndex = -100;

const image = new Image();
image.src = "data:image/svg+xml;base64, " + encodedImage;

// ...
Let's now add some CSS styles to the image. Insert the styles between the image.src and the image.onload lines and then refresh the browser.
// ...

const image = new Image();
image.src = "data:image/svg+xml;base64, " + encodedImage;

image.style.width = `${width}px`;
image.style.position = "absolute";
image.style.left = `${x}px`;
image.style.top = `${y}px`;
image.style.zIndex = zIndex;

image.onload = () => { document.querySelector("body").appendChild(image); }
5 Let's create a random distribution of snowflakes
In order to do this, we'll want to be able to create multiple snowflakes. Rather than copy and paste multiple times, we'll use a for loop. We'll also use some browser objects to get the height and width of the page. Finally, we'll use a random function to help with distributing the snowflakes.
In the code below, we're wrapping the existing code in a for loop, capturing the screen width and height and then combining those values with a randomly generated number between 0 and 1 to give us the x, y coordinates. We're also increasing the zIndex to 100 to ensure it appears on top of everything - to make it easier to see the snowflake distribution.
for (let i  = 0; i < 100; i++) {

    const screenWidth = window.innerWidth;
    const screenHeight = window.innerHeight;

    const width = 25;
    const x = Math.random() * screenWidth
    const y = Math.random() * screenHeight
    const zIndex = 100;

    const image = new Image();
    image.src = "data:image/svg+xml;base64, " + encodedImage;
    image.style.width = `${width}px`;
    image.style.position = "absolute";
    image.style.left = `${x}px`;
    image.style.top = `${y}px`;
    image.style.zIndex = zIndex;
    image.onload = () => {
      document.querySelector("body").appendChild(image);
    }

}
Refresh your browser and you should see something similar to this.
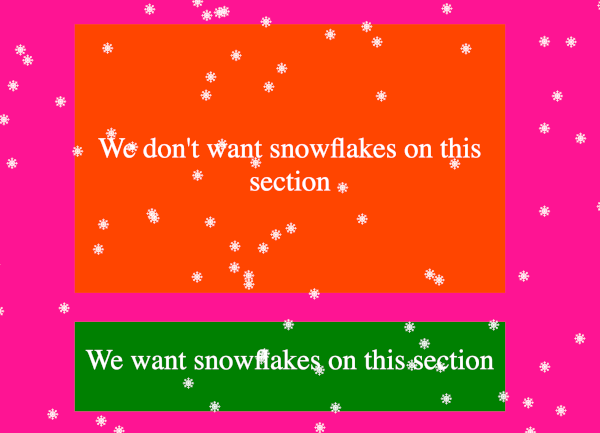
Okay, we're getting there. Nothing animated yet, it's still only a static snapshot, but we know we're heading in the right direction.
6 Let's create a re-sizeable random distribution of snowflakes
What happens if I just resize my screen?

Oops!
Let's go back to the drawing board and see what we can do it improve the situation.
Hmmm...we need to make a few changes. We need to listen to the resize event and when that happens, we need to re-draw the snowflakes across the re-sized screen. We should also ensure we remove the previous ones, which means we'll need to store the images in an array. Rather than copying and pasting code that needs to be run in two different places, we should create a re-usable function.
let snowflakes = [];

window.addEventListener("resize", () => {
    snowflakes.forEach(({image}) => {
      document.querySelector("body").removeChild(image);
    });
    snowflakes = [];
    generateSnowflakes();
});

const generateSnowflakes = () => {

    for (let i = 0; i < 100; i++) {

      const screenWidth = window.innerWidth;
      const screenHeight = window.innerHeight;

      const width = 25;
      const x = Math.random() * screenWidth
      const y = Math.random() * screenHeight
      const zIndex = 100;

      const image = new Image();
      image.src = "data:image/svg+xml;base64, " + encodedImage;
      image.style.width = `${width}px`;
      image.style.position = "absolute";
      image.style.left = `${x}px`;
      image.style.top = `${y}px`;
      image.style.zIndex = zIndex;
      image.onload = () => {
        document.querySelector("body").appendChild(image);
      }
      snowflakes.push({x, y, image});
    }
}
generateSnowflakes();
Refresh your browser, re-size it. Keep re-sizing it. You should notice that now the snowflakes make use of all the available screen.
7 Let's start animating it
Rather than use setInterval for the animation, we're going to use requestAnimationFrame which is the more modern approach. When resizing, we'll need to cancel the animation so we keep track of its id in a variable called reqAnimationId.
We'll update the anonymous function (for the resize event) to cancel the animation using cancelAnimationFrame as well as call the new animate() function after the call to generateSnowflakes().
Minor change to the generateSnowflakes() function. We need to know when it's safe to apply animations to the snowflake on the DOM. The image.onload anonymous callback function takes care of that by setting the ready field to true in the snowflakes array.
Finally, the animate function takes care of animating the snowflakes. It does this by increasing the y axis by 1px each frame. There is also some code that checks if the snowflake has fallen off the screen and, if so, it puts it right back at the top again (in a loop). It's offset by 100px so that it slowly edges on to the screen.
let snowflakes = [];
let reqAnimationId = null;

window.addEventListener("resize", () => {
    snowflakes.forEach(({image}) => {
        document.querySelector("body").removeChild(image);
    });
    snowflakes = [];
    cancelAnimationFrame(reqAnimationId);
    generateSnowflakes();
    animate();
});

const generateSnowflakes = () => {

    for (let i = 0; i < 100; i++) {

        const screenWidth = window.innerWidth;
        const screenHeight = window.innerHeight;

        const width = 25;
        const x = Math.random() * screenWidth
        const y = Math.random() * screenHeight
        const zIndex = 100;

        const image = new Image();
        image.src = "data:image/svg+xml;base64, " + encodedImage;
        image.style.width = `${width}px`;
        image.style.position = "absolute";
        image.style.left = `${x}px`;
        image.style.top = `${y}px`;
        image.style.zIndex = zIndex;
        image.onload = () => {
        document.querySelector("body").appendChild(image);
            snowflakes[i].ready = true;
        }
        snowflakes.push({x, y, image, ready: false});
    }
}

const animate = () => {
    reqAnimationId = requestAnimationFrame(animate);
    for (let i = 0; i < snowflakes.length; i++) {
        if (snowflakes[i].ready) {

            if (snowflakes[i].y > window.innerHeight) {
                snowflakes[i].y = -100;
            }

            snowflakes[i].y += 1;
            snowflakes[i].image.style.top = `${snowflakes[i].y}px`;
            snowflakes[i].image.style.left = `${snowflakes[i].x}px`;
        }
    }
};

generateSnowflakes();
animate();
Refresh your browser and you should see something like this below.
8 Let's animate it more!
Okay, we have some animation. But it isn't very dynamic. Let's make them wriggle a little as they descend gently to earth.
Let's add a new array called xMovementVertical towards the top
after
let reqAnimationId = null;
Here, the values represent potential x-Axis movement, to the left,
to the right or just on the same point. We'll use the
Math.random() function later on to pick a value. I decided to use
an array so that it's easier to make changes if needed and also
see the bias.
// ...

let snowflakes = [];
let reqAnimationId = null;

// Mostly vertical
const xMovementVertical = [-1, -1, -1, 1, 1, 1, 0, 0, 0, 0, 0, 0, 0, 0, 0];

// ...
Here we're adding some conditional logic to ensure that if the snowflake edges off screen on the x-axis, it will re-appear on the opposite side of the screen.
We're also now make the movement along the x-axis a little more dynamic by randomly selecting a value from the xMovementVertical array.
Add this code after the existing y-axis code in the animate
function and before
snowflakes[i].y += 1;
// ...

if (snowflakes[i].y > window.innerHeight) {
    snowflakes[i].y = -100;
}

if (snowflakes[i].x > window.innerWidth + 10) {
    snowflakes[i].x = 0;
} else if (snowflakes[i].x < -10) {
    snowflakes[i].x = window.innerWidth;
}

snowflakes[i].x += xMovementVertical[Math.floor(Math.random() * xMovementVertical.length)];

// ...
Refresh your browser and you should see something like this. Isn't that a lot more interesting?
9 Let's make it a little more configurable
Okay. So, we're nearly done. What would be a lot more useful is if we can expose some of the internals so that it is possible to change the size, the zIndex etc. It might be nice if we can decide which direction the along the x-axis the bias is. Let's do a little re-write to support this.
We're exposing the following: zIndex, numberOfSnowflakes, width, directionBias and step. Step determines how quickly the animation runs, essentially the number of pixels moved along each frame.
It turns out that window.innerHeight wasn't good enough when we start scrolling down longer pages. Due to cross-browser compatibility issues, the height was calculated using the following approach:
let height = Math.max(
body.scrollHeight,
body.offsetHeight,
html.clientHeight,
html.scrollHeight,
html.offsetHeight
                );
Finally, I moved everything into a new function called makeItSnow. This means that we can call it multiple times, with different values, to get a more interesting snow scene.
const makeItSnow = ({
  zIndex = 2000,
  numberOfSnowflakes = 100,
  width = 25,
  directionBias = 0,
  step = 2,
}) => {
  const encodedImage =
    "PHN2ZyB2ZXJzaW9uPC9zdmc+Cg==";
  let body = document.body,
    html = document.documentElement;
  let height = Math.max(
    body.scrollHeight,
    body.offsetHeight,
    html.clientHeight,
    html.scrollHeight,
    html.offsetHeight
  );
  let reqAnimationId = null;
  let snowflakes = [];

  const xMovementRight = [1, 1, 1, 1, 1, 1, -1, -1, 0, 0, 0, 0, 0, 0, 0];
  const xMovementLeft = [-1, -1, -1, -1, -1, -1, 1, 1, 0, 0, 0, 0, 0, 0, 0];
  const xMovementVertical = [-1, -1, -1, 1, 1, 1, 0, 0, 0, 0, 0, 0, 0];

  window.addEventListener("resize", () => {
    snowflakes.forEach(({ image }) => {
      document.querySelector("body").removeChild(image);
    });
    snowflakes = [];
    cancelAnimationFrame(reqAnimationId);
    height = Math.max(
      body.scrollHeight,
      body.offsetHeight,
      html.clientHeight,
      html.scrollHeight,
      html.offsetHeight
    );
    generateSnowflakes();
    animate();
  });

  const generateSnowflakes = () => {
    for (let i = 0; i < numberOfSnowflakes; i++) {
      const x = Math.round(Math.random() * window.innerWidth);
      const y = Math.round(Math.random() * height);
      const image = new Image();
      image.src = "data:image/svg+xml;base64, " + encodedImage;
      image.style.width = `${width}px`;
      image.style.position = "absolute";
      image.style.left = `${x}px`;
      image.style.top = `${y}px`;
      image.style.zIndex = zIndex;
      image.onload = () => {
        document.querySelector("body").appendChild(image);
        snowflakes[i].ready = true;
      };
      snowflakes.push({ x, y, image, ready: false });
    }
  };

  const animate = () => {
    reqAnimationId = requestAnimationFrame(animate);
    for (let i = 0; i < snowflakes.length; i++) {
      if (snowflakes[i].ready) {
        if (snowflakes[i].y > height) {
          snowflakes[i].y = -100;
        }

        if (snowflakes[i].x > window.innerWidth + 10) {
          snowflakes[i].x = 0;
        } else if (snowflakes[i].x < -10) {
          snowflakes[i].x = window.innerWidth;
        }

        if (directionBias < 0) {
          snowflakes[i].x +=
            xMovementLeft[Math.floor(Math.random() * xMovementLeft.length)] *
            step;
        } else if (directionBias > 0) {
          snowflakes[i].x +=
            xMovementRight[Math.floor(Math.random() * xMovementRight.length)] *
            step;
        } else {
          snowflakes[i].x +=
            xMovementVertical[
              Math.floor(Math.random() * xMovementVertical.length)
            ] * step;
        }

        snowflakes[i].y += step;
        snowflakes[i].image.style.top = `${snowflakes[i].y}px`;
        snowflakes[i].image.style.left = `${snowflakes[i].x}px`;
      }
    }
  };

  generateSnowflakes();
  animate();
};

const sizes = [
    { size: 25, directionBias: -1 },
    { size: 50, directionBias: 1 },
    { size: 100, directionBias: 0 },
];

sizes.forEach(({size, directionBias }) => {
    makeItSnow({ numberOfSnowflakes: 20, width: size, zIndex: 75, directionBias });
});
Refresh your browser and you should see something like this.
10 Next Steps
If you managed to reach the end of this tutorial, well done! Give yourself a pat on the back!
As mentioned, all the source code is available on Github at:
https://github.com/disruptionlaboratory/make-it-snow
On Github I also show how you can wrap up the code in conditional logic so that it only activates during the Christmas period.